Microsoft Word: Beyond the Basics
- Getting the Desktop Version of MS Word for Free
- Add/Remove Space After Paragraph
- Insert Page Break
- Formatting the Header and Inserting Page Numbers
- Paper Size and Margins
- Viewing Measurements in Inches or Centimeters
- Turning on the Ruler View
- Show Formatting Marks
- Paragraph Styles and Indenting First Lines
- Aligned and Justified Text
- Hanging Indent
- Change Case
- Toggle Track Changes On and Off
As a PSU student or employee, you can get your own desktop copy of Microsoft Office 365 (including MS Word, Excel, PowerPoint, Teams, and Outlook, etc.) for free!
- To download the desktop version of Office 365 from the PSU website, go to the GUS portal, log-in with your PSU credentials (your PSU email ID and password).
- Select Office 365. This will open the Office cloud app (a low-power version of MS Office that you can use online without downloading the app).
- Wait a second or two until you see <Install apps> in the upper right-hand corner of the welcome screen.
- Click on <Install apps>, and then select <Microsoft 365 apps> to begin the download.
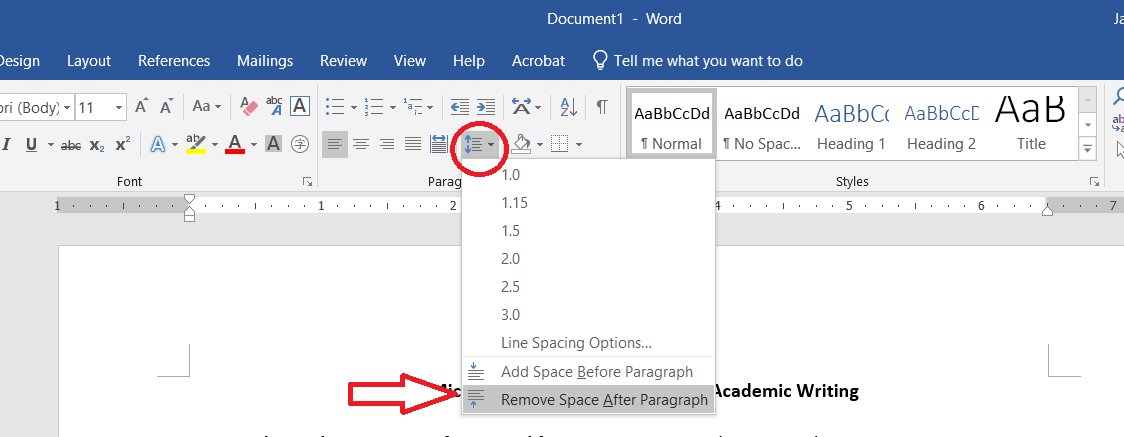
When you use the <enter> key to create a line break (that is, to start a new paragraph), MS Word automatically adds extra blank space between paragraphs. To toggle that feature off or on, use the line spacing tool (just above the word “Paragraph” in the middle of the Home ribbon). Click on the down arrow to open the Line Spacing dropdown menu and look for Add/Remove Space Before Paragraph and Add/Remove Space After Paragraph at the bottom of the menu (see Figure 1).
Figure 1
The Line Spacing Tool
To remove extra space in an existing document, select the content with extra spaces, or use Select All to select the entire document (see Figure 2), and then use the Add/Remove Space Before Paragraph and Add/Remove Space After Paragraph tools to remove extra blank lines. NOTE: This will only remove extra lines add automatically by MS Word. Extra lines that you have added by using the <Enter> key will need to be removed individually using the <Delete> key.
Figure 2
Select All

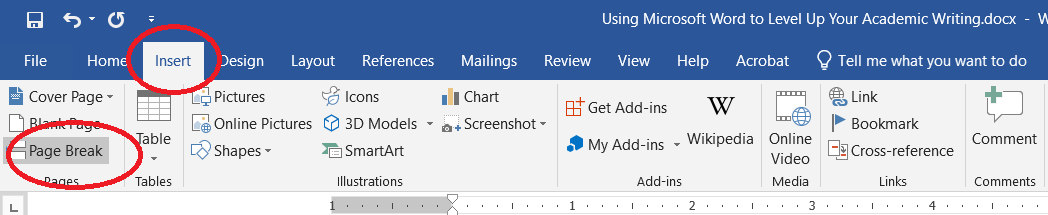
When your document has content that needs to start at the top of a new page (for example, for a works-cited list or references list or when you’re using an APA-formatted title page) you can insert a page break (see Figure 3) where you want to start the new page. The content after the page break will always start at the top of a new page, no matter what changes you make on preceding pages.
Figure 3
Insert Page Break
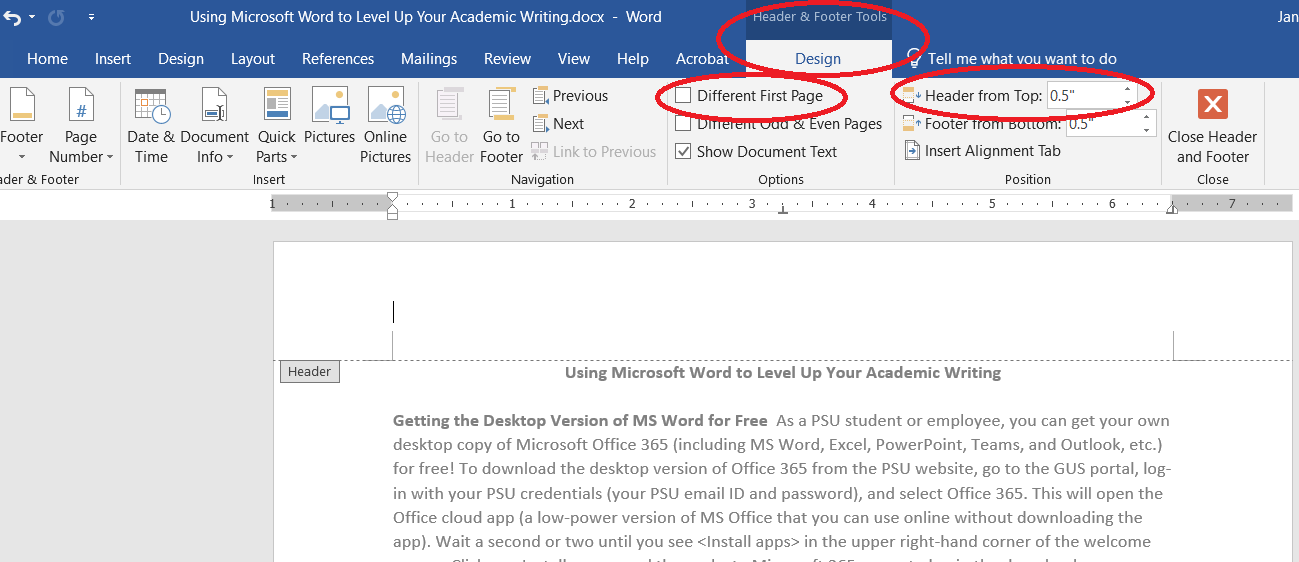
In document design terms, headers and footers are text elements (including page numbers) that appear in the top or bottom margins of the page. To open the Header and Footer Tools in the Design ribbon, double click in the top or bottom margin of any page in the document. For most academic papers, the page number will be in the header, .5 inch (1.27 cm) from the top of the page, and page numbering will begin on the first page, so the Different First Page option should be unselected (see Figure 4).
Figure 4
Header and Footer Tools
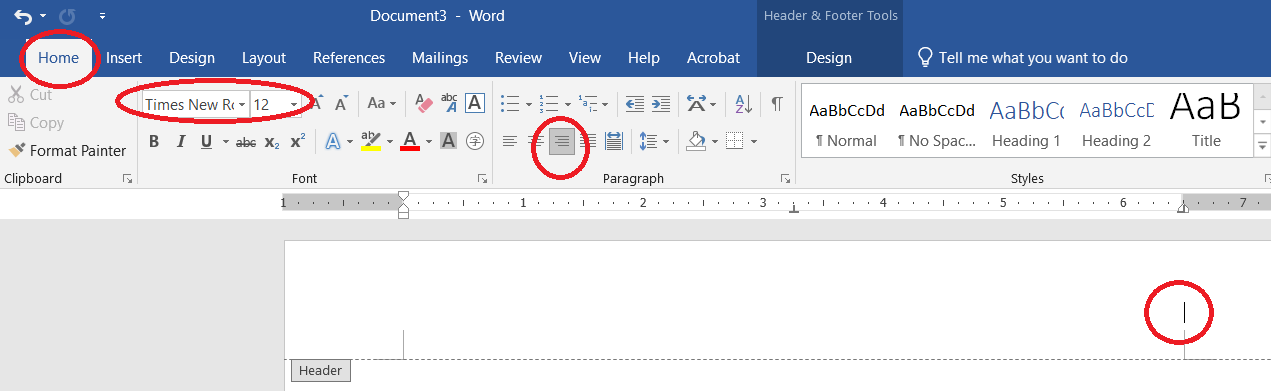
To insert a page number with the fewest clicks, double click in the top margin to put your cursor in the header. Then go to the Home ribbon, select the same font and size as the body of your paper, and select right align to put your cursor at the right margin (see Figure 5).
Figure 5
Insert Page Number, Part 1
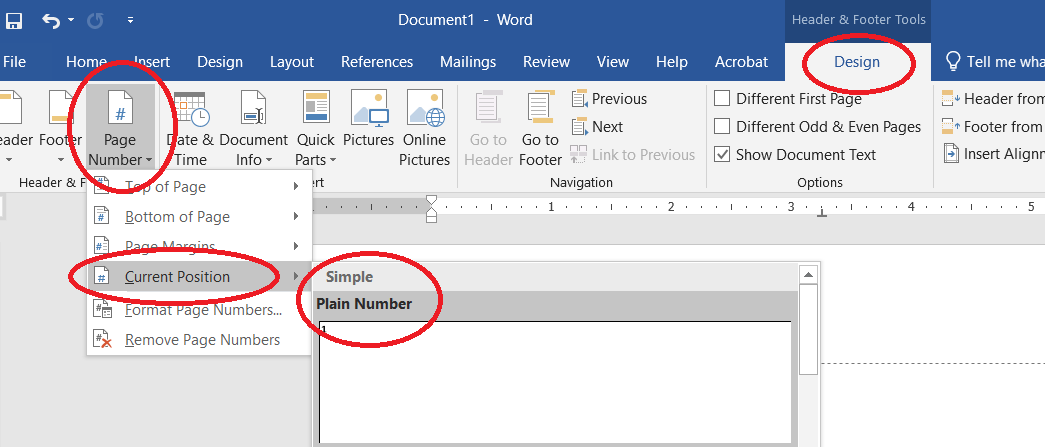
Then go to the Header and Footer Tools in the Design ribbon, find the Page Number tool at the left-hand end of the ribbon, and use the down arrow to open the Page Number drop-down menu (see Figure 6). From the drop-down menu, select Current Position and then Plain Number. That will put the page number exactly where your cursor is on the page.
Figure 6
Insert Page Number, Part 2
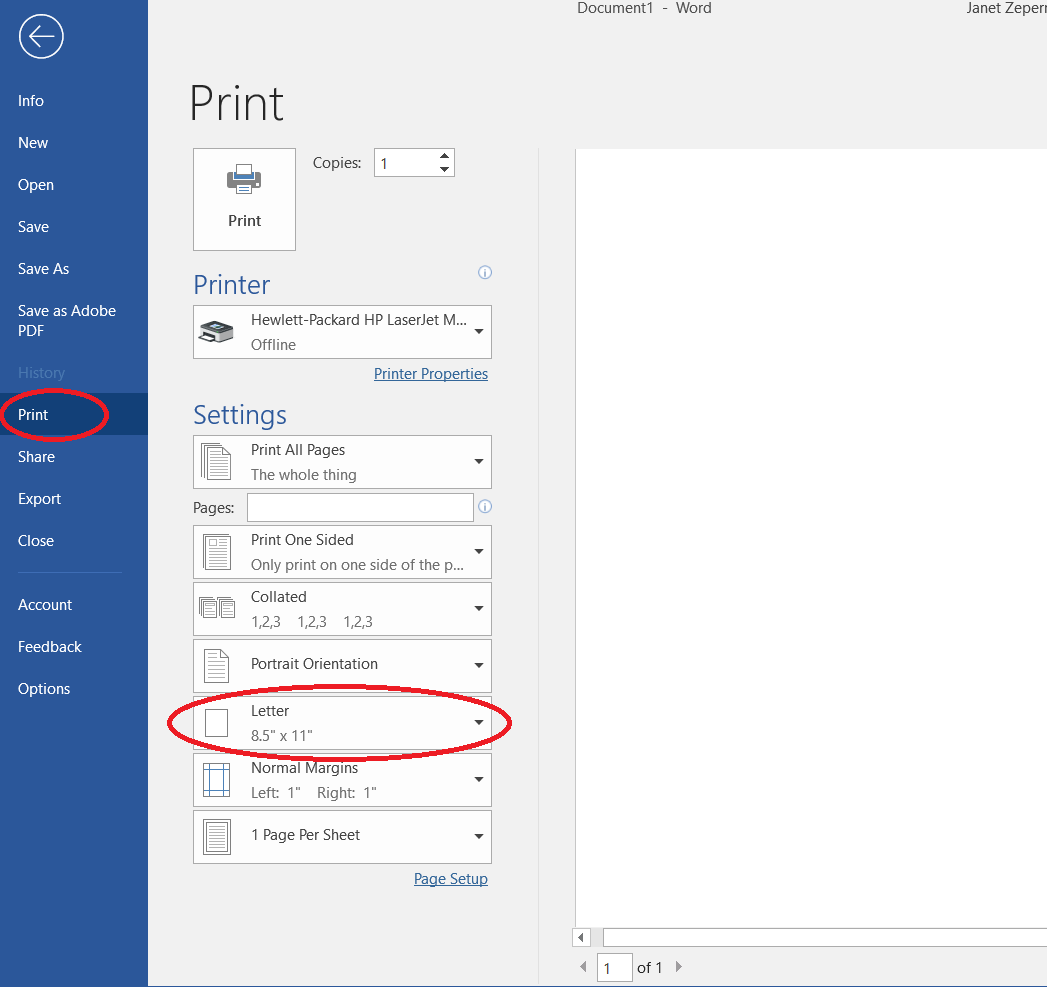
In the US, paper sizes are in inches, and the most common size for academic and business documents, called “letter size,” is 8.5 x 11 inches. This is similar to A4 (21 x 29.7 cm), but it’s different enough so that a document formatted for A4 paper will not print correctly on letter-sized paper. In most US universities and offices, A4 paper is not available, so for printing in the US, it’s necessary to resize A4 documents to letter size (8.5 x 11 inches).
To change the paper size, open the File tab (to the left of the Home ribbon), select Print, and then find the menu option showing the current paper size (see Figure 7). Use the dropdown menu to select the paper size you plan to use for printing.
Figure 7
Set Paper Size
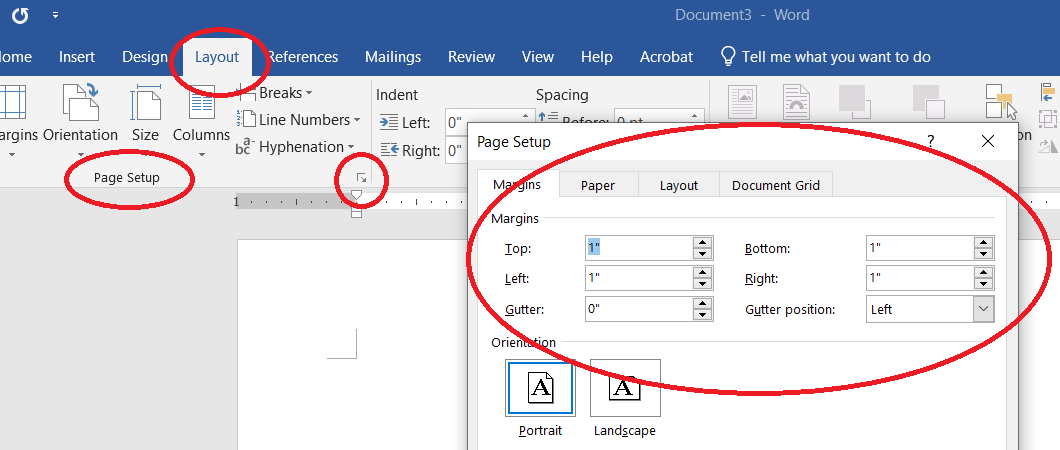
In a document formatted for printing, the margin is the empty space between the text and the edge of the page. In the US, most academic and business documents use one-inch (2.54 cm) margins. To set the margins, go to the the Layout ribbon and open the Page Setup menu using the small gray arrow below the word “Hyphenation” (see Figure 8). In the Page Setup menu, the Margins tab lets you set the size for top, bottom, left, and right margins.
Figure 8
Page Setup
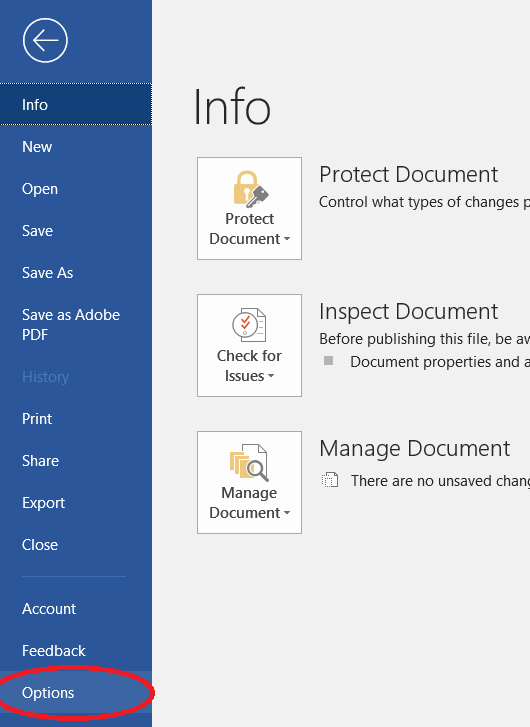
You can change MS Word’s default measurement system to English (inches) or metric (centimeters) in the Options menu. Open the File tab and select Options at the bottom of the File menu (see Figure 9).
Figure 9
The Options Menu
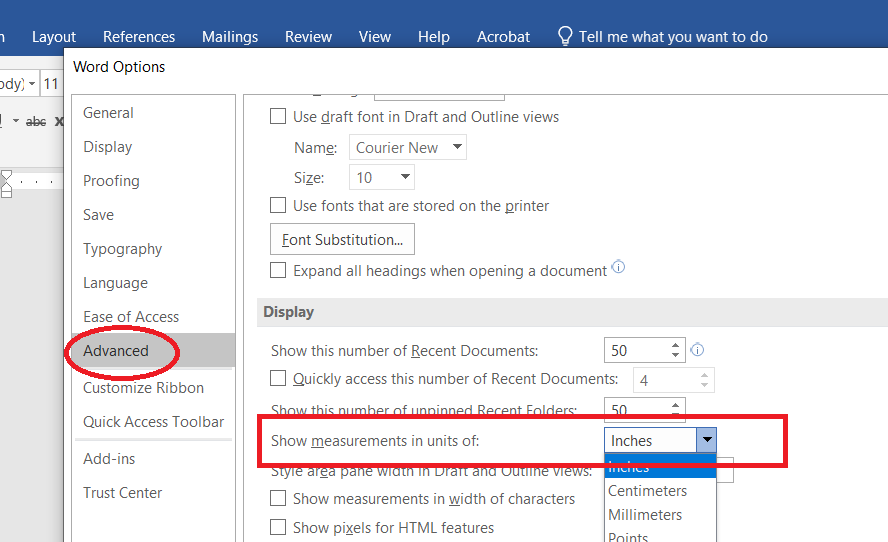
In the Options menu, select Advanced, scroll down to Display and “Show measurements in units of,” and then use the dropdown menu to select inches or centimeters (see Figure 10).
Figure 10
Measurement Units
The Ruler is used to easily set, change, and check page margins, indentation, and tab stops. To turn on the Ruler, open the View ribbon and select the Ruler (see Figure 11).
Figure 11
Select the Ruler

To check line spacing, spacing's after punctuation, and other formatting, you can use the Show Formatting Marks toggle switch (see Figure 12) to turn the formatting marks view on and off.
Figure 12
Show Formatting Marks

In US business writing and writing for the web, paragraphs are often single-spaced, and paragraph breaks are shown using extra space between paragraphs. MS Word is optimized for business writing, which is why it defaults to adding extra space after paragraphs. For US academic writing, paragraphs are double-spaced without extra space between paragraphs, and paragraph breaks are shown by indenting the first line of each paragraph .5 inch.
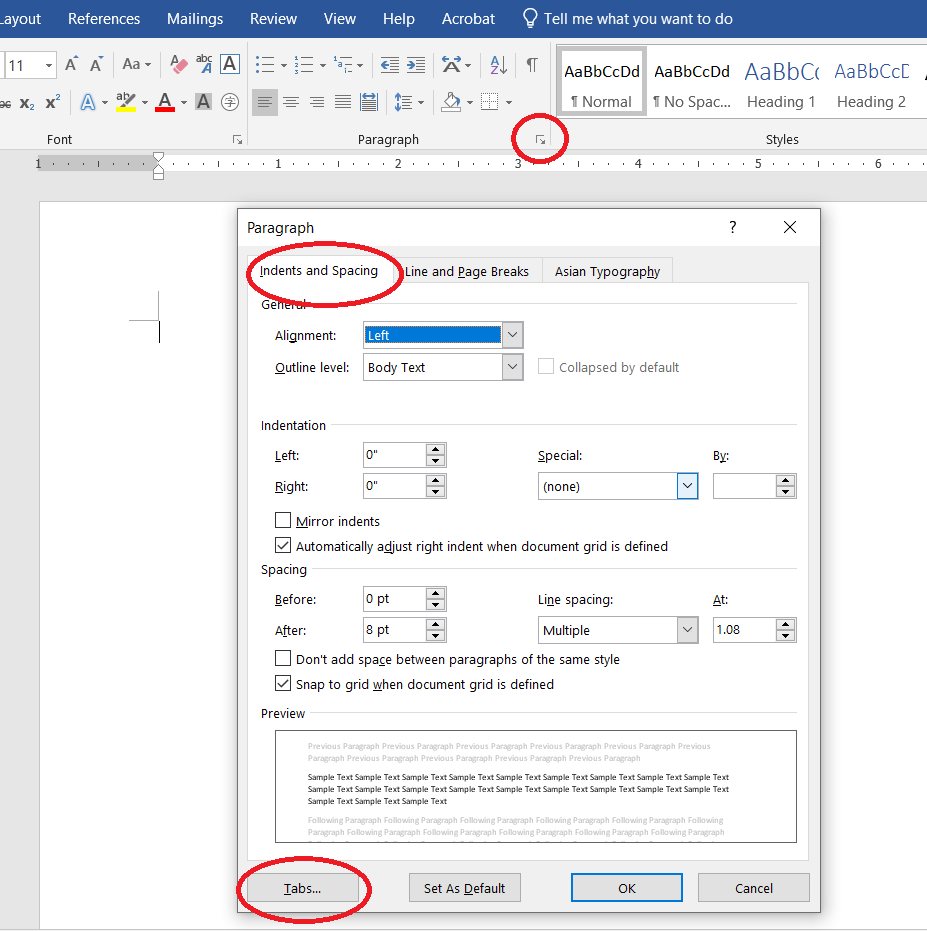
The easiest way to indent the first lines of paragraphs is to set the default tab stop for .5 inch and then use the <tab> key once at the beginning of each paragraph. To set the default tab stop, go to the Home Ribbon and use the tiny gray arrow in the bottom right corner of the Paragraph tab to open the Paragraph menu. In the Indents and Spacing tab, click on Tabs… at the bottom of the menu to open the Tabs tool (see Figure 13).
Figure 13
Locate the Tabs Tool in the Paragraph Menu
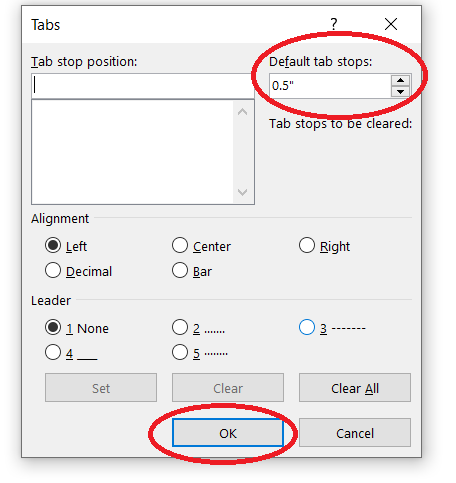
In the Tabs tool, use the up and down arrows to adjust the tab stop to .5” (1.27 cm) (see Figure 14).
Figure 14
Set the Default Tab Stop
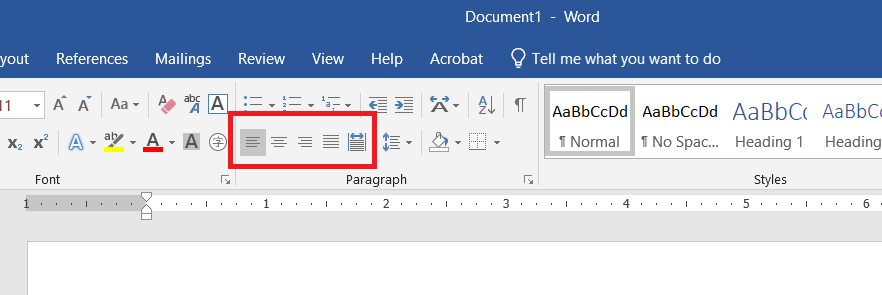
Text is “aligned” if each line of text begins (left side) or ends (right side) at the same point. MS Word offers four alignment options: left-aligned, centered, right-aligned, or justified (left- and right-aligned) (see Figure 15).
Figure 15
Select Alignment
In the US in most newspapers and many magazines and textbooks, text is justified, meaning that all lines of text are the same length (other than the first and last lines of each paragraph), and each block of text has straight edges on both the left and right sides. However, the standard for academic writing in the US is left-aligned, with the first line of each paragraph indented .5 inch.
To select alignment, go to the Home ribbon, and look for the alignment buttons above and to the left of the word Paragraph (See Figure 15).
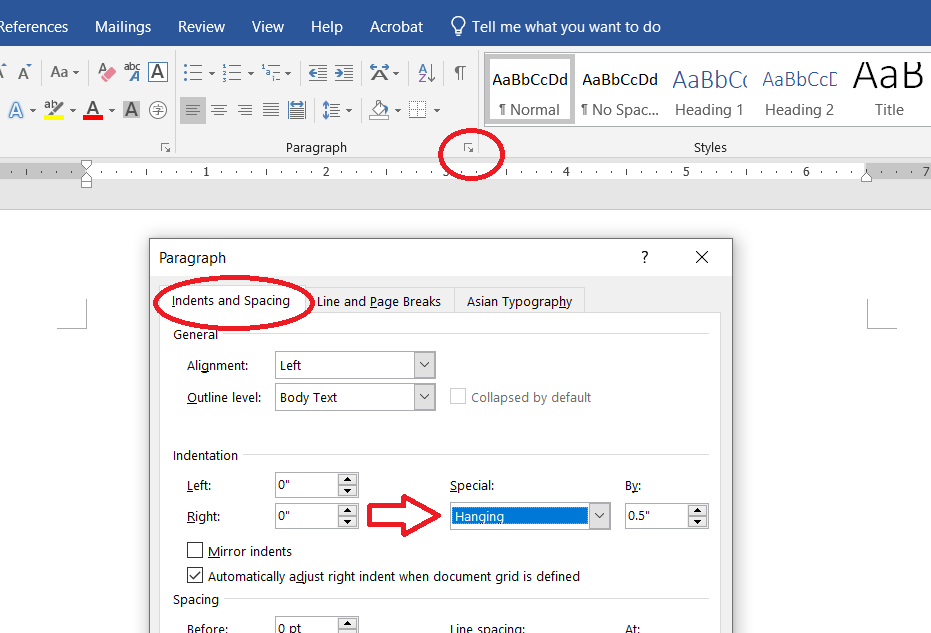
A hanging indent refers to a paragraph format in which the first line starts at the left margin and second and subsequent lines are indented. Hanging indents are used in formatting bibliography entries in APA format (the references list) and MLA format (the works-cited list). To set up a hanging indent that will be repeated for multiple items (as in a bibliography), go to the Home ribbon, use the small gray arrow to open the Paragraph menu, and in the Indents and Spacing tab go to the Indentation tool. Use the “Special” dropdown menu to select Hanging, and set the width of the indentation using the up and down arrows in the “By:” menu to the right of the Special menu (see Figure 16). For standard academic writing, a hanging indent should be .5 inch.
Figure 16
Set Up a Hanging Indent
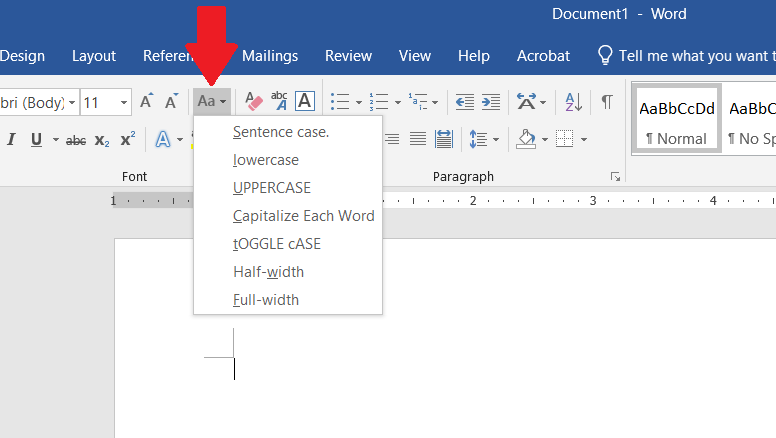
The Change Case tool lets you easily change capitalization in existing content without retyping. This is especially useful in situations where you need to change a title capitalized in title case to sentence case (for example when creating a references list entry in APA format). To change case, select the text you want to change, go to the Home ribbon, and use the Change Case dropdown menu to select the capitalization you want to use (see Figure 17).
Figure 17
Change Case
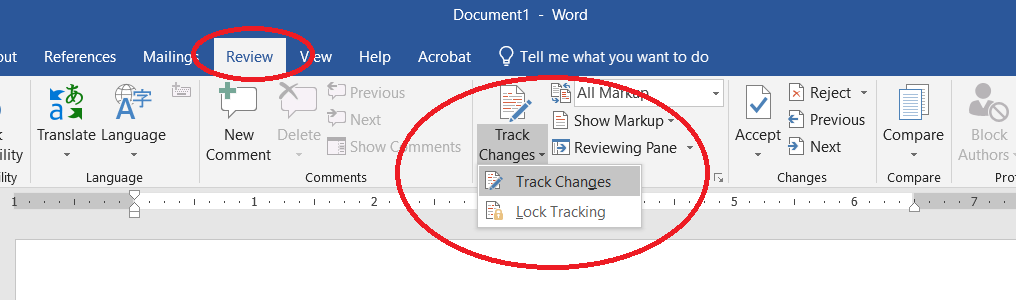
The Track Changes tool allows you to track the changes you make to a document in a form that can be used later to selectively accept or reject individual changes. To turn on Track Changes, go to the Review ribbon, click the down arrow next to Track Changes, and then select Track Changes (see Figure 18). Click on Track Changes again to toggle off. You can toggle Track Changes on and off without losing past tracked changes.
Figure 18
Turn On Track Changes